Night photography unveils a world that many never see. From star-filled skies to the vibrant energy of cityscapes after dark, shooting at night offers unique creative opportunities. In this comprehensive guide, we'll explore the techniques, equipment, and creative approaches that will help you create compelling night images.
The Magic of Night Photography
Night photography is about more than just shooting in darkness—it's about capturing the interplay of light and shadow in low-light conditions. The absence of daylight reveals different aspects of familiar scenes and allows artificial light sources to take center stage.

The blue hour—just after sunset—offers a magical balance of natural and artificial light
Night photography encompasses several sub-genres:
- Astrophotography: Capturing the stars, Milky Way, or celestial events.
- Urban nightscapes: Cityscapes, street scenes, and architecture illuminated at night.
- Light painting: Using movable light sources to "paint" during long exposures.
- Night landscapes: Natural landscapes under moonlight or starlight.
- Night events: Fireworks, festivals, concerts, and other nighttime gatherings.
Essential Equipment for Night Photography
Night photography places specific demands on your gear. Here's what you'll need:
Camera
- Manual mode capability: Essential for full control over exposure settings.
- Good high-ISO performance: Modern cameras with larger sensors generally perform better in low light.
- Bulb mode: For exposures longer than 30 seconds.
- Live view: Helpful for focusing in dark conditions.
Lenses
- Fast aperture: Lenses with maximum apertures of f/2.8 or wider gather more light.
- Wide-angle: Ideal for astrophotography and cityscapes (14-24mm range).
- Standard zoom: Versatile for various night scenes (24-70mm range).
- Telephoto: For compressed city views or isolated architectural details (70-200mm range).
Essential Accessories
- Tripod: Absolutely essential for the long exposures needed in night photography. Choose one that's sturdy and stable.
- Remote shutter release: Prevents camera shake during long exposures.
- Extra batteries: Long exposures and cold night temperatures drain batteries quickly.
- Headlamp: Preferably with a red light mode to preserve your night vision while allowing you to see your gear.
- Lens cloth: Condensation and dew can form on lenses during night shoots.
Optional but Useful
- Filters: Neutral density filters for long exposures during blue hour; light pollution filters for astrophotography.
- Light painting tools: Flashlights, LED panels, steel wool (use with extreme caution), and other creative light sources.
- Hand warmers: To prevent lens condensation in cold conditions.
- Apps: Star trackers, moon phase calendars, and light pollution maps help plan night shoots.

A sturdy tripod and remote release are essential for sharp night images
Planning Your Night Photography Session
Success in night photography often depends on thorough planning:
Location Scouting
- Daytime visits: Scout locations during daylight to identify compositions and potential hazards.
- Light pollution: For astrophotography, use dark sky maps to find areas away from city lights.
- Access and safety: Ensure you have legal access to locations and consider safety concerns of being in certain areas after dark.
- Foreground elements: Identify interesting foreground elements that will complement night skies.
Timing Considerations
- Blue hour: The period just after sunset or before sunrise when the sky takes on deep blue tones.
- Golden hour: The period just before sunset when warm light bathes the landscape.
- Astronomical conditions: For astrophotography, check moon phases (new moon is best for stars), Milky Way position, and potential aurora activity.
- Urban events: Research when buildings are illuminated, when fountains operate, or when special events occur.
Camera Settings for Night Photography
Night photography requires a different approach to camera settings:
Basic Settings
- Shooting mode: Manual is essential for full control.
- File format: RAW provides maximum flexibility for post-processing.
- White balance: Auto works for most situations, but you might want to experiment with Tungsten for urban scenes or a custom Kelvin setting.
- Long exposure noise reduction: Consider turning this off as it doubles your exposure time. Apply noise reduction selectively in post-processing instead.
Exposure Settings
Night photography involves balancing three exposure variables—aperture, shutter speed, and ISO—but with different considerations than daytime shooting:
- Aperture: Use the widest aperture your lens offers (lowest f-number) for astrophotography to gather maximum light. For cityscapes where more depth of field is needed, f/8 to f/11 often works well.
- Shutter speed: For static scenes, use whatever length is needed for proper exposure, from seconds to minutes. For star photography, follow the "500 rule" to avoid star trails: divide 500 by your lens focal length to get the maximum exposure time in seconds (e.g., 500 ÷ 24mm = ~20 seconds).
- ISO: Start around ISO 800-3200 for astrophotography, or ISO 100-400 for urban scenes with plenty of artificial light. Adjust as needed for proper exposure.
Balancing aperture, shutter speed, and ISO is crucial for successful night exposures
Focusing in the Dark
Achieving sharp focus is one of the biggest challenges in night photography:
Techniques for Sharp Focus
- Manual focus: Autofocus often struggles in low light, so switch to manual focus.
- Live view magnification: Use your camera's live view and zoom in digitally to fine-tune focus on bright stars or distant lights.
- Hyperfocal distance: For landscapes with both foreground and stars, focus at the hyperfocal distance to maximize depth of field.
- Focus stacking: Take multiple images focused at different distances and blend them in post-processing.
- Flashlight method: Temporarily illuminate a foreground object at your desired focus distance, focus on it, then switch to manual focus to lock it in.
Types of Night Photography and Specific Techniques
Astrophotography
Capturing the night sky requires specific approaches:
- Milky Way photography: Use a wide-angle lens (14-24mm), set aperture to f/2.8 or wider, ISO to 1600-6400, and exposure to 15-25 seconds (depending on focal length).
- Star trails: Use longer exposures (minutes to hours) or stack multiple shorter exposures to show the apparent rotation of stars around the celestial pole.
- Star trackers: These specialized mounts move your camera in sync with the earth's rotation, allowing longer exposures of the night sky without star trails.
- Composition: Include interesting foreground elements to provide context and scale to the sky.
The Milky Way creates a dramatic backdrop for landscape photography
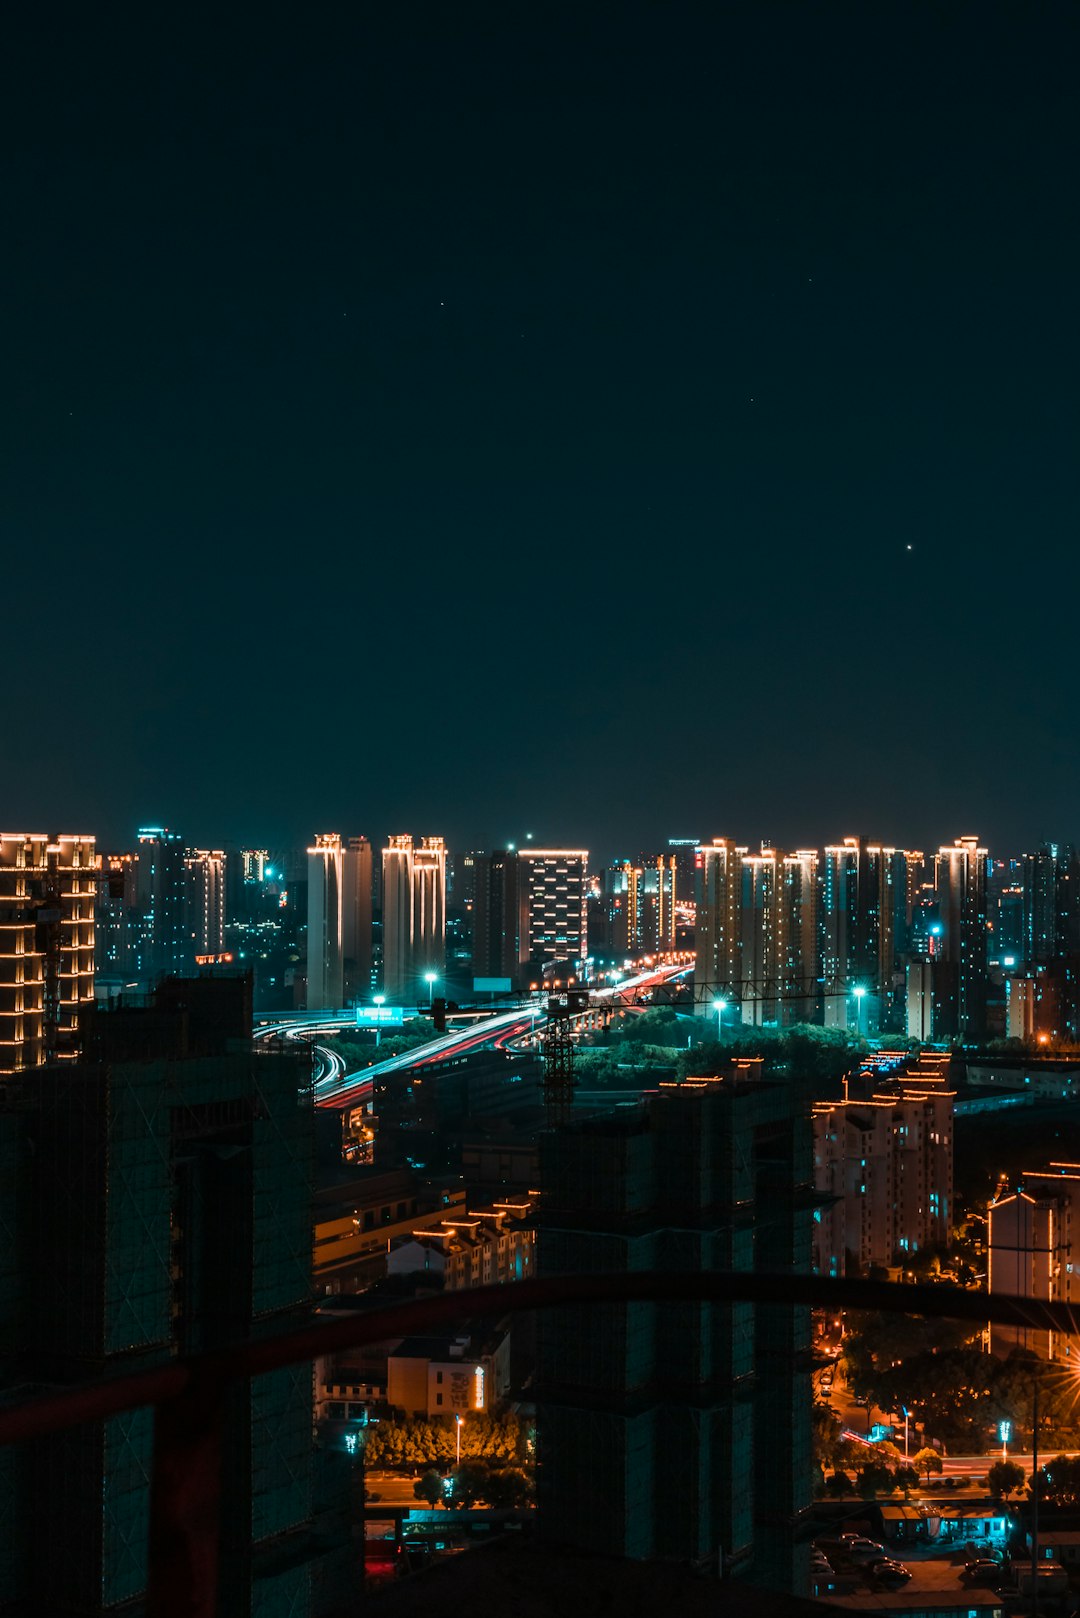
Urban Night Photography
Cities transform after dark, offering rich photographic opportunities:
- Blue hour: The period just after sunset provides a perfect balance between ambient and artificial light.
- Light trails: Use long exposures (10-30 seconds) to capture car headlights and taillights as streaks of light.
- Reflections: Wet streets after rain create stunning reflections of city lights.
- Architecture: Buildings lit up at night reveal different characters than during the day.
- Street photography: Capture the human element of cities at night, focusing on lit storefronts, restaurants, and nightlife.
Long exposures transform moving traffic into rivers of light
Light Painting
Light painting uses movable light sources during long exposures to create unique effects:
- Basic technique: Set up your camera on a tripod, use a long exposure (10-30 seconds), and move light sources through the frame during the exposure.
- Tools: Flashlights, LED lights, glow sticks, sparklers, and specialized light painting tools.
- Illuminating objects: "Paint" light across objects to selectively illuminate them during a long exposure.
- Creating patterns: Move lights in patterns to create shapes, words, or abstract designs.
- Steel wool spinning: Creates shower-like sparks (requires extreme caution and appropriate locations to avoid fire hazards).
Creative Techniques for Night Photography
Beyond the basics, these techniques can add creative dimensions to your night images:
- Silhouettes: Position subjects against illuminated backgrounds like cityscapes or the twilight sky.
- Reflections: Use water, glass, or other reflective surfaces to create symmetry and visual interest.
- Panoramas: Stitch multiple images together for expansive night scenes.
- Time-lapse: Create videos showing the movement of stars, clouds, and city lights over time.
- Composite photography: Blend multiple exposures to overcome the technical limitations of a single frame.

Reflections add symmetry and depth to night cityscapes
Post-Processing Night Photography
Night images often require more post-processing than daytime shots:
Basic Adjustments
- White balance: Adjust to achieve the desired mood—cooler for a more mysterious feel or warmer for a cozier atmosphere.
- Exposure: Fine-tune the overall brightness, often pushing shadows while being careful not to clip highlights.
- Contrast: Night scenes often benefit from increased contrast to add depth and dimension.
- Noise reduction: Apply selectively to minimize noise while preserving detail.
- Sharpening: Apply carefully, as over-sharpening can emphasize noise.
Advanced Techniques
- Luminosity masks: Allow precise adjustments to specific brightness ranges.
- Star enhancement: Techniques to make stars more prominent without looking artificial.
- Light pollution removal: Gradient filters and selective color adjustments can reduce the orange glow from city lights.
- Exposure blending: Combining multiple exposures to capture both bright and dark areas effectively.
Safety and Practical Considerations
Night photography involves unique challenges and safety considerations:
- Personal safety: Always inform someone of your location and expected return time. Consider shooting with a companion in remote or urban areas at night.
- Navigation: Bring a headlamp, spare batteries, and potentially a GPS device or detailed map.
- Weather awareness: Check forecasts and be prepared for changing conditions, especially in remote areas.
- Clothing: Dress appropriately for the environment, recognizing that temperatures often drop significantly at night.
- Permissions: Some locations require permits for photography, especially at night.
Finding Your Night Photography Style
As you develop your night photography skills, you'll begin to discover your unique aesthetic:
- Study masters: Learn from photographers like Michael Kenna, David Noton, and Lance Keimig who have distinctive night photography styles.
- Experiment: Try different techniques, subjects, and processing approaches to discover what resonates with you.
- Develop projects: Create cohesive series of night images around specific themes or locations.
- Find your light: Some photographers are drawn to the blue hour, others to the deeper darkness of late night. Discover which lighting conditions speak to you.
Night photography offers a fascinating playground for creativity and technical mastery. By embracing the darkness and learning to work with the limited and dramatic lighting available after sunset, you'll create images that reveal a world many never see—a world of mystery, beauty, and unexpected revelation.